Introduction
SpeechBlend is a Unity plugin for real-time character lip syncing. SpeechBlend works by analyzing the audio signals from any AudioSource component. To create realistic facial expressions that align with speech, SpeechBlend uses viseme blendshapes.
Visemes are the shapes our faces make when we are producing certain sounds. Think of the circular shape your lips make when you make an “OOO” sound. This is the main tool used by SpeechBlend.
A machine learning model is used to predict the most likely viseme (mouth shape). In order to use the viseme prediction features, a character model with viseme blendshape must be used.
SpeechBlend has three modes:
- Jaw-only joint tracking: Using a single jaw joint, SpeechBlend will open and close the character’s mouth according to the playing audio.
- Jaw-only blendshape tracking: Same as mode 1, but using a “mouth open” blendshape.
- Jaw and viseme tracking: Using both the jaw blendshape (or joint) as well as a set of viseme blendshapes to provide more realistic lip syncing.
Setting up a Character for Jaw and Viseme Tracking
Setting up Blendshapes
To take advantage of viseme tracking, a suitable character should be available. At the moment SpeechBlend supports three sets of viseme blendshape templates:

Using characters from these software packages makes the setup easier, but any custom character model with similar viseme blendshape sets will work.
Adding SpeechBlend to a Character in Your Scene
1. With your character loaded, add an AudioSource component to your character’s head bone or root if it doesn’t have one already. Ensure there is some Audio Clip playing either at start or controlled by some other script.
2. Add the SpeachBlend component to your character’s root (or anywhere)
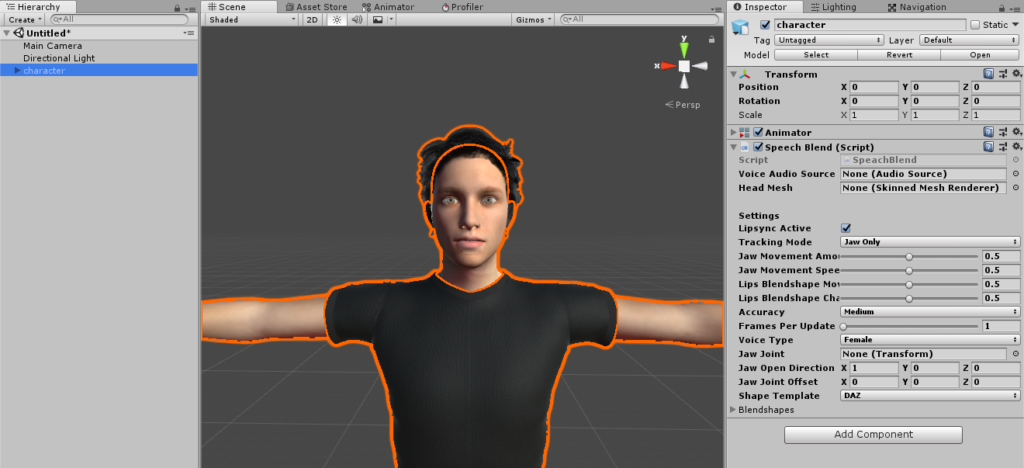
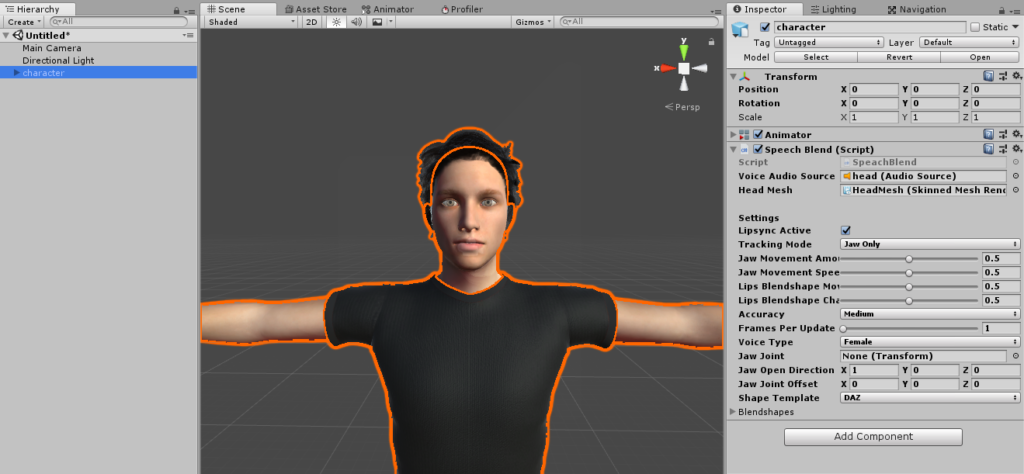
3. Drop the character’s speech Audio Source into Voice Audio Source and drop the character’s head mesh (containing the blendshapes) into Head Mesh.
4. Select what viseme template you want by changing Shape Template.
5. Open the Blendshapes dropdown. Try clicking the Auto-Detect button which will try to search the head mesh for the correct blendshapes and fill them in the editor. If some are missing, select them manually using the viseme and mouth open drop-down menus.
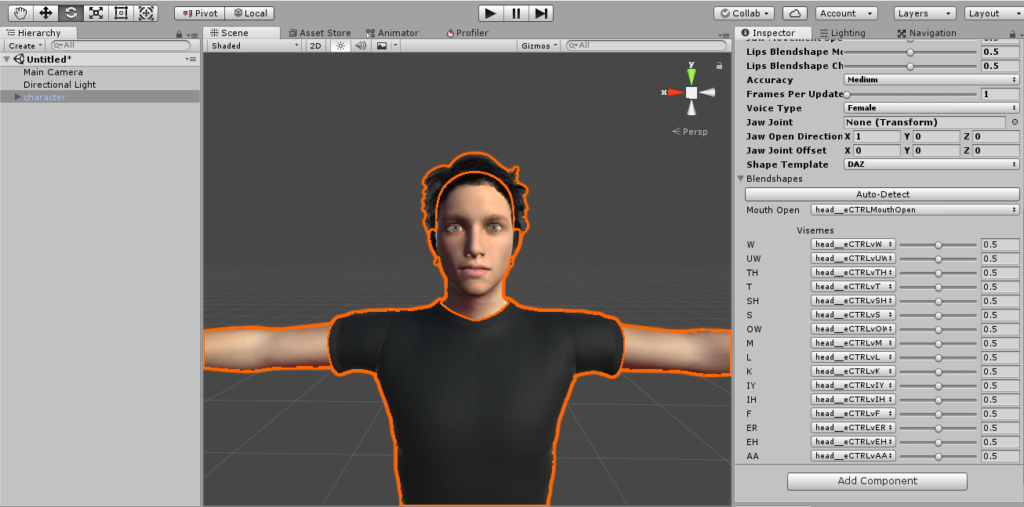
6. Since we are using viseme tracking, go ahead and change Tracking Mode to Jaw and Visemes.
7. Done! Assuming the AudioSource is playing something, the lip syncing should now work. Note that the accuracy can be improved significantly by tweaking the settings.
SpeechBlend Settings
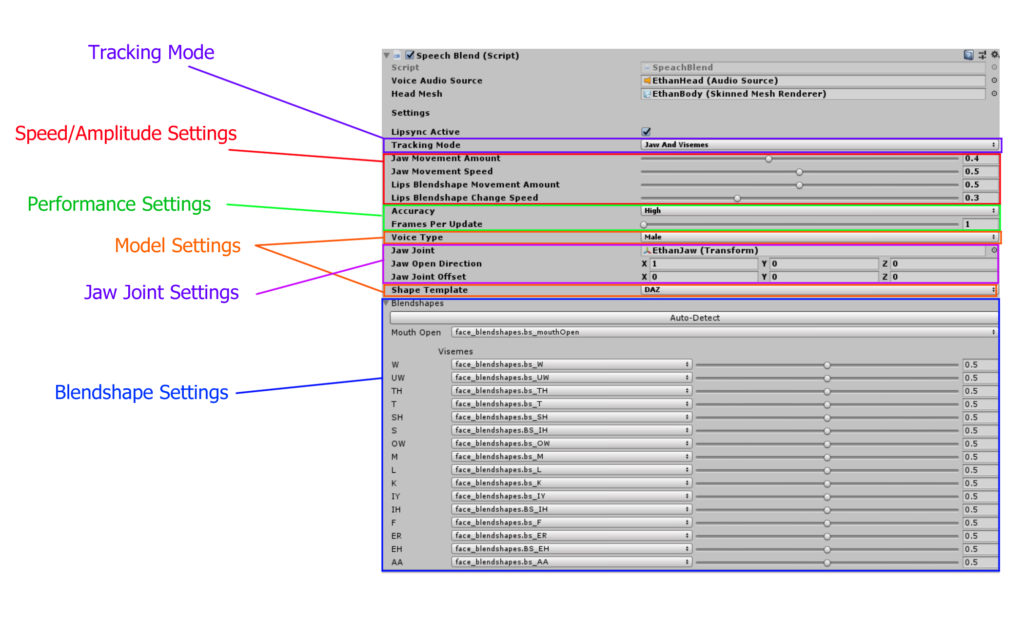
Tracking Mode: Select whether to use jaw-only tracking or jaw-with-viseme tracking
Speed/Amplitude Settings: The Amplitude of mouth/lip movement controls the maximum amount of blendshape activation. Lower values of amplitude will make the lip syncing more subtle. The Change Speed will change the rate at which viseme states will move from one to the other. Lower values will look smoother but may also look slurred if set too low.
Performance Settings: The Accuracy setting (Low, Medium, High) controls the total number of calculations used to predict viseme shapes. “Low” will use the fewest number of calculations. Frames Per Update determines how many frames the solver will wait before updating the viseme calculations. Setting this to “1” means it will update on every frame.
Model Settings: Voice Type will set which model is used for speech analysis. “Male” should be set for male-sounding voices and vice-versa for better accuracy. Shape Template will select which set of viseme blendshapes appear in the drop-down menu. Currently, the only available templates are “Daz”, “iClone6”, and “iClone5”.
Jaw Joint Settings: If using jaw joint-based mouth movement, the Jaw Open Direction and Jaw Joint Offset can be adjusted so that the mouth is closed at rest and that it opens in the correct direction.
Blendshape Settings: In this menu the “mouth open” and viseme blendshapes can be selected from the available head mesh blendshapes. The slider on the right of each viseme allows for the amplitude of each viseme to be tuned.
Microphone Input
See the demo scene “SpeechBlendMicrophoneInputDemo” and the associated script “SpeechBlendMicrophoneInput.cs” for an example of how to route audio from a microphone through a character’s AudioSource.
Note that microphone input is not supported when building a WebGL project.
WebGL Support
SpeechBlend support WebGL projects. To ensure that SpeechBlend functions correctly within your WebGL build, you must include an additional library file: “SpeechBlend_WEBGL_AudioSpectrum.jslib” to the html code launching the build. As an example, using the default index.html generated by unity in your project build folder, add the code contained in “SpeechBlend_WEBGL_AttachJSLIB.txt” to the bottom.
After adding these lines to index.html, when it is opened with a browser, SpeechBlend should perform lipsyncing.
Support
If you are having issues with SpeechBlend or have a suggestion, please go to www.TinyAngleLabs.com/contact-us and get in touch.